|
Capture NX Interface |
Capture NX: When you run NX the first time (opening a NEF photo), you will
see a screen that looks similar to this (TIP: Press 'F' at any time to
enter/exit full screen mode).
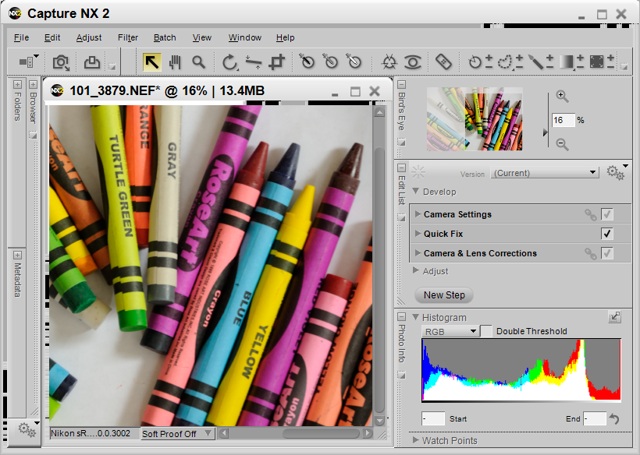
Toolbar Palettes: Along the top and sides (left/right) of the photo
window, you will find toolbar palettes. Once you become familiar with NX,
most of what you need to do can be accomplished via the palette interface.
(TIP: Press 'TAB' at any time to hide/show all toolbar palettes).
One of these toolbars is the 'Edit List', which is a fundamental
feature to understand within Capture NX.
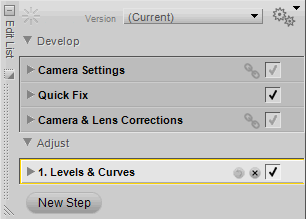
The 'Edit List' and New Step: The edit list contains
and ordered list of all of the changes (adjustments) made to your photo.
The first step is always 'Develop' (added by Capture NX; can not be deleted),
containing 'Camera Settings', 'Quick Fix', and 'Camera and Lens Corrections'.
To add a new step to the end of the edit list, click on 'New Step'.
Develop: Always the first step in the Edit List.
A list of common (plus NEF specific) adjustments typically made
to photos. The order in which the adjustments are actually
performed is 'undefined', and Capture NX will perform them
in the order which results in the highest quality photo.
The 'Selection' of 'Develop' is always the entire photo.
Adjustment: A single enhancement made to a photo, like contrast,
brightness, color balance, unsharp mask, noise reduction, photo effects,
etc. Each Adjustment can be refined to have a specific Opacity (transparency)
and blending technique.
|
The Nikon Capture NX manual talks about "Adjustments" and "Enhancements". I
suspect the developers chose "Adjustment", while the PR and documentation
people thought "Enhancement" sounded better. I use "Adjustment" because when
you click on 'New Step', you see "Select Adjustment", not "Select Enhancement".
|
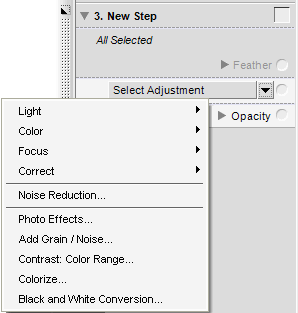
Step: A Step consists of one or more ordered Adjustments,
all of which apply to a Selection (all or part of a photo) specific
to the step. There will be a
 next to the step
that you are interacting with. next to the step
that you are interacting with.
New Step Button: The 'New Step' button at the bottom of the Edit List
allows you to add a generic step to the edit list.
As you can see (above), you must click on 'Select Adjustment' to
select which specific Adjustment to make at this step.
Also, new steps (by default) have a Selection of the entire photo. Just
use the
Selection tools
to make the adjustment apply to just a portion of a photo.
You can think of a step as a 'layer' of changes, which
normally replaces the prior layer, but the layer can
also be 'blended' with the prior layer.
Selection: The default Selection for a step is the entire photo
(see 'All Selected' in the step to the right), but can be changed to
most any complex shape by using the
Selection tools
(brush, lasso, polygon, rectangle, oval, gradient). A selection can be
'Feather'ed to facilitate a more natural blending of the Adjustment
edge with the photo.
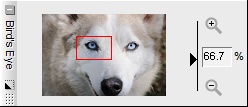
Quickly Zoom in/out: Use the Birds Eye to quickly zoom in/out and move around your photo:
|
- Zoom in: Press the + magnifying glass
- Zoom out: Press the - magnifying glass
- Move: Drag the red rectangular box
|
More Terminology
Dynamic Range: The ratio between the smallest and largest light intensity
values that can be recorded, commonly expressed in photography in terms of EV.
Even the first computers with only 16 colors had black and white, meaning they had a large
dynamic range, so 'dynamic range' is only the first part of the story.
Tonal Range: The second part of the story is tonal range, which is the
number of tones (or shades) in a particular dynamic range.
RGB: RGB stands for 'Red, Green, and Blue'.
Computers (and your digital camera) reference any color as a
specific combination of three primary colors, red, green, and blue.
 RGB from Wiki RGB from Wiki
Luminance: It describes an amount of light (or brightness) without regard to color
(chrominance). Think old black & white television.
Chrominance: Or, chroma for short, describes a color, without regard for
brightness (luninance).
HSB: HSB stands for 'Hue, Saturation, and Brightness'.
HSB from Wiki
LCH: LCH stands for 'Luminosity, Chroma, and Hue'.
White Balance: If I take a picture of you outside in bright sun, or inside
under incandescent or florescent lighting, the RGB colors recorded (of you) by
a digital camera change slightly. The process used to correct that color shift
is called 'white balance'. Most photos can benefit greatly, even from subtle
white balance changes.
White Balance from Wiki
Neutral/Gray Point: A neutral (or gray) point is often used to correct white
balance problems -- but a point (or region) that you select. Basically, you need
to select a point in a photo that you know should have no color to it (but it
probably does have a color cast to it in your photo). That means white, any shade of gray, and
even black. This is a critical concept to understand. As you look at a photo, regardless
of the current colors you see, you are selecting a point (or region) that you know
'should' have no color to it. That is all the information that is needed to correct
most white balance problems.
|
 If NX101.com helps you, help this site by making a donation.
|