 |
Adding Watermarks to Photos |
Watermark: While Capture NX does not currently allow you to create a
'selection' based upon an image, or text (which would make creating a
watermark really easy), you can still create a simple watermark if you
are willing to 'draw' the watermark using the mouse and brush tools.

Step 1
|
Step 1: Click on the '+' brush. A 'Colorize' step has been added into the edit list.
Double click on the brush in the F6 toolbar to open the 'Selection Brush Options' dialog
and fine tune the size of the brush (in pixels).

Step 2: Paint the watermark shape
|
Step 2: Paint your watermark over your photo. Don't worry about the color
for now. You actually want to clearly see what you are drawing using the mouse.
TIP: Every time you click, drag, and release the mouse, that is considered
a single brush stroke. You can undo the last brush stroke by pressing CTRL-Z
(or going to 'Edit' menu and selecting 'Undo').
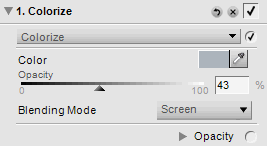
Step 3: In the Colorize properties dialog, change the paint color to gray.
Change the blending mode to 'Screen'. Change the Opacity to a percentage to
makes the watermark look OK to you.

Step 3: Adjust colorize properties
|
Final Result: The final 'watermark' result can be seen below:

Saving the 'Watermark' Step: Remember, this 'watermark' step can be saved (right click
'Save Settings'; remember to save both the 'Colorize' and 'Selection') -- which
then allows you to load the watermark on demand into other photos (in the edit
list, right click, Load Settings), or use the watermark as part of a batch process.
 If NX101.com helps you, help this site by making a donation.
|

