|
NX Selection Area |
Step Selection Area
|
Step Selection Area:
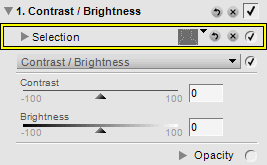
The selection tools edit and modify the Selection area of an 'open' Step which
contains one (or more) Adjustments. Many Adjustments you will want applied
to the entire photo (see 'All Selected', right), but sometimes you only
want a portion of the photo to be
affected. If the step you want modified is not open, just click on the arrow
next to the step to open it (will then have a  next
to it): next
to it):
Selection Tools:
The various selection tools available to you can be seen in the F6 selection toolbar:

and they are:
 Selection Brush -
The brush paint tool. Using the brush tool will paint, using the current brush
options, on the 'active paint surface'. Selection Brush -
The brush paint tool. Using the brush tool will paint, using the current brush
options, on the 'active paint surface'.
Every time you click, drag, and then release the brush (mouse) on
your photo, that is considered a 'brush stroke' -- and pressing CTRL-Z
will 'undo' the last stroke.
Click on '+' to add brush stroke information. Click on '-' to remove brush stroke
information. TIP: Select one and use ALT to select the other.
Single click selects the brush tool, with the last '+' or '-' used remembered.
Double click on the brush icon to open the 'Selection Brush Options' dialog (above right) to
select brush size, hardness, and Opacity.
 Lasso & Marquee Tools - Defines
the 'active paint surface' area (which by default is your entire photo).
Use the '+' to define the area in additive terms (define the
area to paint into). Or use the '-' to define the area in subtractive terms (paints
everywhere except the area you define). TIP: Select one and use ALT to select
the other. Lasso & Marquee Tools - Defines
the 'active paint surface' area (which by default is your entire photo).
Use the '+' to define the area in additive terms (define the
area to paint into). Or use the '-' to define the area in subtractive terms (paints
everywhere except the area you define). TIP: Select one and use ALT to select
the other.
Single click (on the tiny arrow lower right) to select Lasso, Polygon, Rectangle, Oval.
Double click on the Lasso icon to open the 'Lasso & Marquee Options' dialog (above right)
to select Edge Softness.
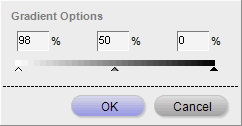
 Selection Gradient - Applies a selection
gradient on the 'active paint surface'. Click and drag on your photo to use. Selection Gradient - Applies a selection
gradient on the 'active paint surface'. Click and drag on your photo to use.
Single click select the gradient tool, with the last '+' or '-' used remembered.
Double click on the gradient icon to open the 'Gradient Options' dialog (right)
to change the look/feel of the gradient.
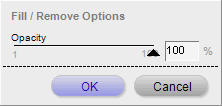
 Fill/Remove Tool - Fills (or removes)
the entire 'active paint surface'. Fill/Remove Tool - Fills (or removes)
the entire 'active paint surface'.
Single click performs the last '+' or '-' operation.
Double click on the Fill icon to open the 'Fill/Remove Options' dialog (right)
to select the 'Opacity' of the fill/remove. To avoid actually doing anything
double click using the right mouse button.
Active Paint Surface: The 'active paint surface' is by default your entire
photo. Use the Lasso & Marquee tools to redefine that area in additive or
subtractive terms. Please note that the Lasso & Marquee tools do not actually
paint anything, but rather just change the surface area in which the other paint
tools will have an effect.
Auto New Step:
If there is no step that is open ,
using the selection tools will add a new step to the edit list, with
the Colorize Adjustment. Please note that you are NOT locked into
the Colorize Adjustment, which can be easily changed later (just click
on 'Colorize' in the edit list to change). Rather, the Colorize Adjustment
is a convenience so that you can actually see the selection that you are
making.
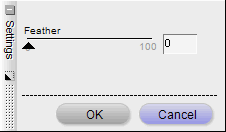
Feather: A selection with sharp edges might not look natural. A very
quick way to make most any selection look more natural is to use the 'feature'
feature. Increasing 'feather' will soften the edge of a slection, creating
a little transparency and blending it into your photo.
Bugs: Sometimes a right click on the tools brings up options (brush),
sometimes a choice (lasso), and sometimes nothing at all (gradient & fill).
Also, when using the tool on your photo, pressing ALT will reverse the tools
action (from '+' to '-' and from '-' to '+'). But press and hold a tool, press
ALT, and the icon will change ('+' to '-'), but the tool action will not. You
have to first release the mouse button (stop using a tool) for ALT to work properly.
TIP: How to view/see complex selections:
It can be very difficult to see the actual selection for
some adjustments. 'View' / 'Show Selection' shows the selection,
but not over top of your photo. Add a linked
'Colorize' Adjustment to your step and adjust the selection. Check and
uncheck the Colorize Adjustment as you refine your selection. When
finished uncheck (or delete) the linked 'Colorize' Adjustment.
This usually (but not always) works great.
TIP: How to paint an adjustment over your photo: Select
an Adjustment, then press the 'Clear Image' button ('-' Fill Tool button)
and use the other '+' tools (like the brush) to paint your Adjustment
onto your photo.
 If NX101.com helps you, help this site by making a donation.
|