|
D-Lighting |
Active D-Lighting: To maximize the number of OOC (out-of-camera) JPEG's
keepers turn ADL on. But
Active D-Lighting (ADL) is a feature of newer Nikon
digital camera's and is based within the camera (and not just post processing)
-- and as such, it is a RAW Adjustment. Nikon says it "preserves details in highlights
and shadows". It must be turned on within the camera and can NOT be turned
on after the fact -- but it can be turned OFF after the fact.
Once turned on in the camera, later in Capture NX you have the ability to set
it to "unchanged, off, low, normal, high, or extra high".
Since Active D-Lighting is a RAW adjustment, hopefully the quality of this
adjustment is better than 'after the fact' D-Lighting (below).
This needs more research.
How it works: Take the same picture with and without ADL and notice
that the exposure changes. ADL purposefully underexposes a photo a little
(I have seen 2/3 stop) and internally applies a custom tone curve protect
highlights and protect shadow detail. WARNING: Underexposing 2/3 stop, followed
by push processing is like using a higher ISO. As a result, Nikon urges
caution using ADL with high ISO (can happen with auto ISO).
TIP: To maximize the number of OOC (out-of-camera) JPEG's
keepers, turn ADL on. But if you intend to edit a NEF in NX anyway, turn ADL
off -- because you can always manually recover with normal D-lighting below.
|
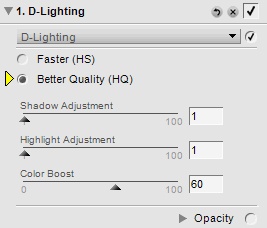
D-Lighting: D-Lighting is (under 'Light' menu) a NX Adjustment, which
can be a step added after the fact. It is pretty good a recovering
detail from underexposed areas of your photo (brightening just the dark areas
of your photo). It is a quick, easy and very effective tool to use.
Just make sure to always select the "Better Quality (HQ)" method!
The problem I have with the D-Lighting tool is that when it is
needed most (2EV compensation), it can introduce slight shifts in colors. The
solution then is to use Levels & Curves, or use the custom
+1EV Adjustment
on just the portion of your photo that needs it. For small EV adjustments,
D-Lighting works well.
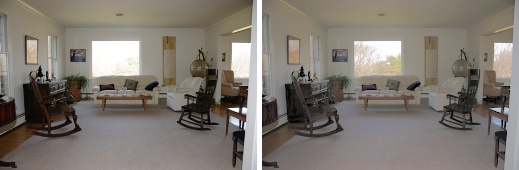
Recover blown hilights:
D-Lighting can also be used to recover a blown hilights. First underexpose
the entire photo
(via Exposure Compensation)
to make the blown hilight look OK. Then use D-lighting to
recover the entire photo. Here is an example of recovering a blown window
hilight, in just a few mouse clicks:
An alternative: Another way of performing D-Lighting is to use
'Levels & Curves'. A similar result in the above 'blown window' example was achieved
with the the following Levels & Curves. Please note that the curve to
use will be unique to each and every photo:
 If NX101.com helps you, help this site by making a donation.
|